VSCode配置Python环境及Python入门学习
Update on A.D.2019.10.17 内容完善中!
大概七月份花了一天的时间把python的基础语法看了一遍,十月份再花了一点时间学习,主要用于写绘制数据图片、网页爬虫、图形界面。
如果你会C++的话,我在这里就写一下如何以最快的速度看完语法,并且学会调用一些基本的库,尽量写到最简,不熟悉的语法和库可以直接查文档或者Google解决。
配置环境
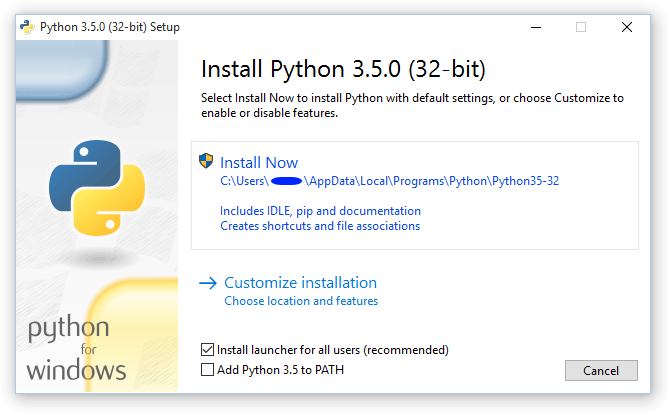
首先去官网下载合适版本并安装
安装时

记得勾选上Add Python 3.x to PATH再进行安装,这样不用自行配置环境变量
在cmd或者powershell下输入python
出现
Python 3.7.3 (v3.7.3:ef4ec6ed12, Mar 25 2019, 21:26:53) [MSC v.1916 32 bit (Intel)] on win32
Type "help", "copyright", "credits" or "license" for more information.
>>>
即代表安装成功
在VSCode中安装

这个插件
按下Ctrl+Shift+P选择Python: 选择解析器 Python: Select Interpreter填写python解析器路径C:/Users/UserName/AppData/Local/Programs/Python/Python37-32/python.exe(默认安装路径是这个)
检查并设置.vscode文件夹下的文件
{
    // 使用 IntelliSense 了解相关属性。
    // 悬停以查看现有属性的描述。
    // 欲了解更多信息,请访问: https://go.microsoft.com/fwlink/?linkid=830387
    "version": "0.2.0",
    "configurations": [

        {
            "name": "Python",
            "type": "python",
            "request": "launch",
            "program": "${file}",
            "console": "integratedTerminal"
        }
    ]
}
{
    "python.pythonPath": "C:\\Users\\UserName\\AppData\\Local\\Programs\\Python\\Python37-32\\python.exe",
}
右键-在终端中运行python文件
调试-启动调试
调试-在不调试的情况下启动
都可以运行,调试可以设置断点
在cmd或者powershell下输入python进入交互环境
使用python 文件名.py运行python文件
使用pip install 库名称安装库
使用pip list查看已安装的库
基础语法
变量
在赋值时被创建
数字
int整型 float浮点型 complex复数
类型转换:int(x) float(x) complex(x,y)
字符串
使用’’或””创建,下标从零开始
转义字符:和C++类似
运算:+连接 *重复 []获取字符
[:]截取,左闭右开
>>>a = "12345"
>>>a[1:4]
234
格式化输出:print(“XXX%sXXX%dXXX” % (‘xxx’, 10))
占位符和C++相同
运算符
** 幂
/ 除
// 整除
>>>2**3
8
>>>21/10
2.1
>>>21//10
2
| C++ | Python |
|---|---|
| $$ | and |
| || | or |
| ! | not |
in 在序列中找到值返回True 否则返回False
not in 相反
其余和C++相同
数据结构
下标从0开始
列表list
类似C++中的vector
l = ['A', 'B', 2019, 2020]
print(l[0]) #第0个
print(l[-2]) #倒数第2个
print(l[1:3]) #第1到第2个
del l[1] #删除第一个
print(l)
list.append(2021) #在末尾添加新对象
print(l)
---
输出:
A
2019
['B',2019]
['A', 2019, 2020]
['A', 2019, 2020, 2021]
剩余内容待更新
调用库
剩余内容待更新
练习
随便练习写了写的东西,但是tkinter不方便也不好看,所以我要再学一下PyQt,也方便以后学习C++的Qt
使用b站视频av号查询数据
调用了b站的api
使用了tkinter最简单的功能
import tkinter as tk
import json
import re
from urllib.request import urlopen

def GetDict(date, keys, default=None):
    keys_list = keys.split('.')
    if isinstance(date,dict):
        dictionary = dict(date)
        for i in keys_list:
            try:
                if dictionary.get(i) != None:
                    dict_values = dictionary.get(i)
                elif dictionary.get(i) == None:
                    dict_values = dictionary.get(int(i))
            except:
                return default
            dictionary = dict_values
        return dictionary

Videojson = ""
def WebRequest(id):
    global Videojson
    Videojson = urlopen("https://api.bilibili.com/x/article/archives?ids="+id).read().decode('utf-8')
    Data = json.loads(Videojson)
    return Data

window = tk.Tk()
window.title('哔哩哔哩数据查询')
window.geometry('485x475')

def insert_point():
    VideoId = ScanId.get()
    VideoData = WebRequest(VideoId)
    ViewTextWindow.delete(0.0, 'end')
    TitleTextWindow.delete(0.0, 'end')
    FavoriteTextWindow.delete(0.0, 'end')
    DanmuTextWindow.delete(0.0, 'end')
    ReplyTextWindow.delete(0.0, 'end')
    CoinTextWindow.delete(0.0, 'end')
    JsonTextWindow.delete(0.0, 'end')
    ViewTextWindow.insert('insert', str(GetDict(VideoData, "data."+VideoId+".stat.view")))
    TitleTextWindow.insert('insert', GetDict(VideoData, "data."+VideoId+".title"))
    FavoriteTextWindow.insert('insert', str(GetDict(VideoData, "data."+VideoId+".stat.favorite")))
    DanmuTextWindow.insert('insert', str(GetDict(VideoData, "data."+VideoId+".stat.danmaku")))
    ReplyTextWindow.insert('insert', str(GetDict(VideoData, "data."+VideoId+".stat.reply")))
    CoinTextWindow.insert('insert', str(GetDict(VideoData, "data."+VideoId+".stat.coin")))
    JsonTextWindow.insert('insert', Videojson)

tk.Label(window, text="输入视频AV号").place(x=350, y=10, anchor='nw')

ScanId = tk.Entry(window)
ScanId.place(x=320, y=45, anchor='nw')

query = tk.Button(window, text="查询", width=6, height=1, command=insert_point)
query.place(x=370, y=70, anchor='nw')

tk.Label(window, text="标题").place(x=10, y=10, anchor='nw')
TitleTextWindow = tk.Text(window,height=1,width=35)
TitleTextWindow.place(x=45, y=15, anchor='nw')

tk.Label(window, text="播放").place(x=10, y=40, anchor='nw')
ViewTextWindow = tk.Text(window,height=1,width=35)
ViewTextWindow.place(x=45, y=45, anchor='nw')

tk.Label(window, text="收藏").place(x=10, y=70, anchor='nw')
FavoriteTextWindow = tk.Text(window,height=1,width=35)
FavoriteTextWindow.place(x=45, y=75, anchor='nw')

tk.Label(window, text="弹幕").place(x=10, y=100, anchor='nw')
DanmuTextWindow = tk.Text(window,height=1,width=35)
DanmuTextWindow.place(x=45, y=105, anchor='nw')

tk.Label(window, text="回复").place(x=10, y=130, anchor='nw')
ReplyTextWindow = tk.Text(window,height=1,width=35)
ReplyTextWindow.place(x=45, y=135, anchor='nw')

tk.Label(window, text="硬币").place(x=10, y=160, anchor='nw')
CoinTextWindow = tk.Text(window,height=1,width=35)
CoinTextWindow.place(x=45, y=165, anchor='nw')

tk.Label(window, text="json").place(x=10, y=190, anchor='nw')
JsonTextWindow = tk.Text(window,height=20,width=60)
JsonTextWindow.place(x=45, y=195, anchor='nw')

window.mainloop()
获取b站视频总播放排名并绘制柱状图
需要matplotlib库
使用https://www.kanbilibili.com的数据,获取更多数据需要写js对网页进行交互,等待python学习以及前端学习来进行改善
from urllib.request import urlopen
import json
import re
import matplotlib.pyplot as plt
import numpy as np
import requests
# -*- coding: UTF-8 -*-

def get_dict_value(date, keys, default=None):
    keys_list = keys.split('.')
    if isinstance(date,dict):
        dictionary = dict(date)
        for i in keys_list:
            try:
                if dictionary.get(i) != None:
                    dict_values = dictionary.get(i)
                elif dictionary.get(i) == None:
                    dict_values = dictionary.get(int(i))
            except:
                return default
            dictionary = dict_values
        return dictionary

videoData = urlopen("https://www.kanbilibili.com/rank/videos").read().decode('utf-8')
videoAvList = re.findall(r'href="/video/av(.*?)"', videoData) # <a href="/video/av36570707"
videoVisit = {}
cnt = 0
Y = []

for i in range(0, len(videoAvList)):
    video_id = videoAvList[i]
    if(video_id in videoVisit): continue
    videoVisit[video_id] = 1
    jsonData = urlopen(
        "https://api.bilibili.com/x/article/archives?ids=" + video_id
    ).read().decode('utf-8')
    Data = json.loads(jsonData)
    cnt += 1
    Y.append(get_dict_value(Data, "data."+video_id+".stat.view"))
    print('rank: %d | av: %s | 播放数:%s' % (cnt, video_id, get_dict_value(Data, "data."+video_id+".stat.view")))
    print('标题:%s' % get_dict_value(Data, "data."+video_id+'.title'))

n = cnt
X = np.arange(n)
plt.bar(X, Y)
plt.bar(X, Y, facecolor='#66ccff', edgecolor='white')
plt.xlim((-0.5, 99))
plt.ylim((1, 100000000))
plt.xlabel('Rank')
plt.ylabel('View')
new_ticks1 = np.linspace(0, 100000000, 11)
plt.yticks(new_ticks1)
new_ticks = np.linspace(0, 99, 100)
plt.xticks(new_ticks)
plt.show()
本文由 落影汐雾 原创,采用 保留署名-非商业性使用-禁止演绎 4.0-国际许可协议
本文链接:https://x.lyxw.xyz/2019/python/